In my last blog post I talked about the PROLOQUO2GO iPad app. PROLOQUO2GO is one of the many apps on the iPad that provide communication for children with Autism or children who are nonverbal, who were not able to communicate before. In this blog post, I am going to talk about two teachers, Ian Stewart and Stacey Carol and their experience with using apps on the iPad to help the Autistic and nonverbal students in their class be able to communicate and show their knowledge.
Apps to help students with Autism.
Parent's Perspective:
Before the iPad, parents of Autistic and nonverbal children truly believed that their kids knew more than they were showing. Now with the help of the iPad, the parents know that they were right!!!
Child's Perspective:
Since using the iPad is much more stimulating than using a pencil and paper, students with Autism and students who are nonverbal are actively engaged in their learning. Through using the iPad, these student's attention spans are enhanced and they are able to focus more because they are more engaged and interested in what they are doing!
Teacher's Perspective/ Why the iPad is Useful in the Classroom:
Stacey and Ian love using the iPad in their classrooms because the iPad apps helped them find out how much their students really did know. Ian admitted that he did not know the extent of one of his students vocabulary, until he started using the app! Using the iPad apps in the classroom also gives the teachers an insight on what the student likes. Ian admitted that he didn't know his student liked operas until the student used the opera. Teachers also love that using the iPad helps children with Autism socialize more with their peers!
While watching the video, parents expressed that even before the iPad, they knew that their children knew a lot more than they were letting on and that they felt that before the iPad their children were trapped inside their own body. Hearing that statement made me think of Roger. While explaining to Roger what I want him to do in the pool, and modeling it for him, it really does seem like he is not paying attention. I prompt Roger multiple times to do what I'm doing, but it's almost impossible for me to tell if he understands since he is not able to tell me and he is not looking at me. I typically end up doing the skills with Roger, rather than Roger performing the skills on his own, which can be frustrating at times, especially when I have a whole group of other kids who need to get a turn as well. I try to keep my frustration level down, but sometimes I do feel that Roger can do more than he currently is. One day last week, when Roger and I were in the pool and I got especially frustrated, Roger pulled me close to him and gave me a hug. Not only did this warm my heart, but it let me know that Roger WAS paying attention and was acknowledging my frustration. This scenario made me relate to the parents feeling that their child was stuck inside their body. It seemed to me, at that moment in the pool, that Roger was listening and wanted to show me that he could do the skills on his own, but his body wouldn't let him.
To see more of Ian and Stacey's success of using iPads in the classroom, watch the video below!!!
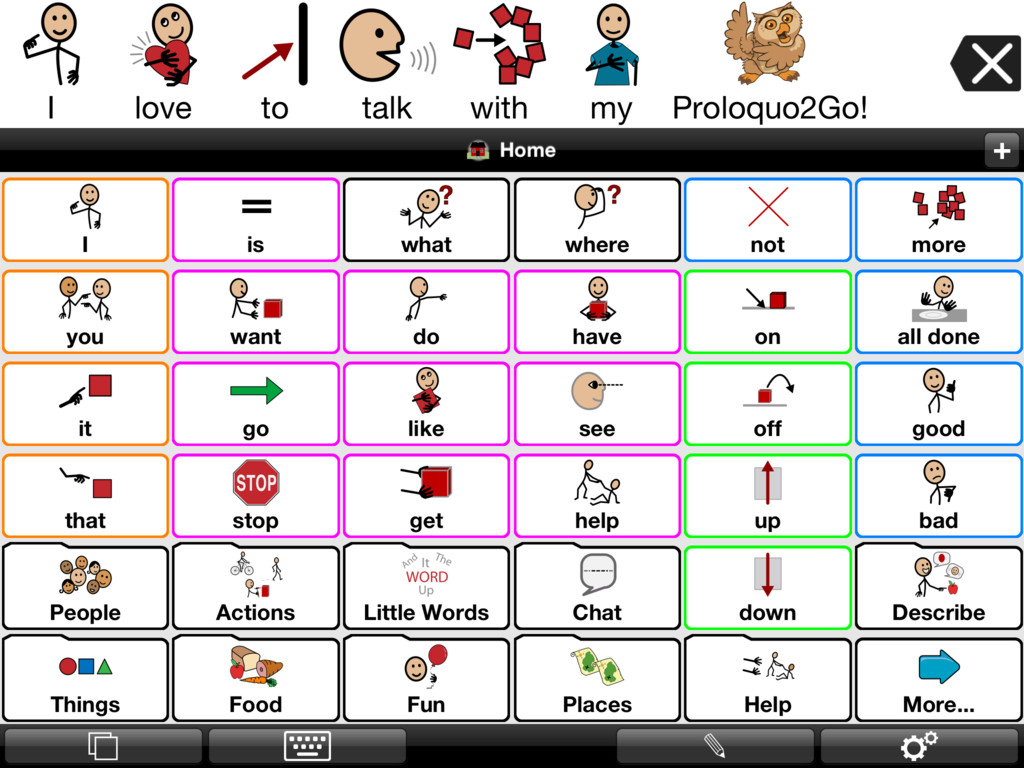
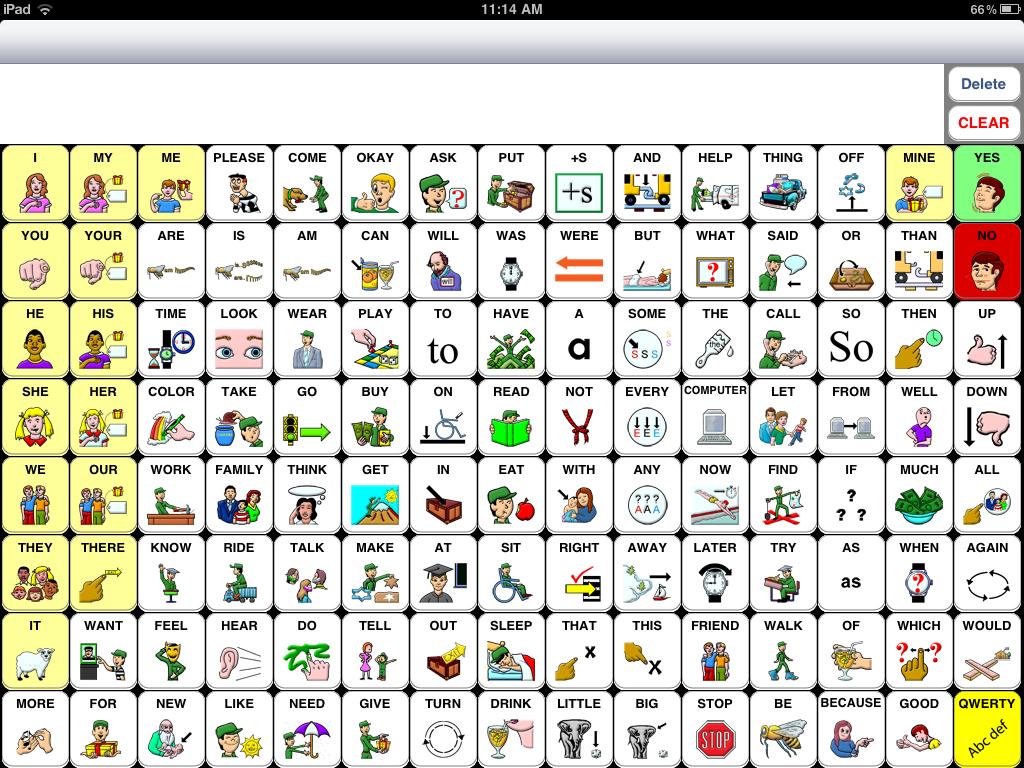
In my last blog post, I talked about the iWriteWords iPad app. The iWriteWords iPad app is a supplemental activity that teachers or parents could use to help their child begin to learn to be able to identify and form letters! In this blog post, I am going to talk about an PROLOQUO2GO, or Speak Out Loud, which is an iPad app that can be used in the classroom to help autistic or nonverbal students be able to communicate!
In the video I watched, Sam Senott, Co-creator of the PROLOQUO2GO iPad app, explain how the app works. The child presses pictures and words and the app speaks out loud to respond to and to ask questions. As the child presses different words and pictures in a sequential order, the app provides a sentence for the app to be able to voice what the child wants to say.
Parent's Perspective:
I think that parents would be absolutely thrilled to have their Autistic or nonverbal child be able to use PROLOQUO2GO! All parents want to be able to communicate with their children and be able to give them what they want. With the help of PROLOQUO2GO, parents will finally be able to have a conversation with their child and their child will be able to tell their parent what they want!
Child's Perspective:
I think it would be extremely frustrating for a child to not be able to tell people what they are thinking and what they want. To be able to function as a human being we need to make sure our basic needs are met. When you are unable to express your needs, it is hard for a parent or a teacher to make sure those needs are being met. With the help of PROLOQUO2GO, an Autistic or nonverbal child would be able to communicate their needs and participate in a conversation. PROLOQUO2GO becomes the child's voice they never had!
Teacher's Perspective:
A teacher as well as a parent wants to make sure the student's in their classes basic needs are met. Every good teacher knows that a child can not learn if their basic needs are not met. If a child who previously could not speak, can now tell their teacher when something is wrong or if they need something, the teacher would be ecstatic!
As I watched this video and learned how great the PROLOQUO2GO app was, I couldn't help but think about Roger. As his swim instructor, it's very stressful for me to not know how he feels. A lot of the younger kids I teach are deathly afraid of the water. When we try to teach them some of the skills, like putting their head in the water, they cry and tell us they don't want to do it. With Roger, he is unable to tell me whether or not he is scared. With the help of the PROLOQUO2GO app, Roger would be able to tell me what he was thinking and it would be a huge relief to know how he feels about the pool!
For more information about the PROLOQUO2GO, watch the video below!
In my last blog post, I discussed different communication apps that a teacher or parent could put on their iPad to help an Autistic child or a nonverbal child be able to communicate. In this blog I am going to talk about the iPad app, iWriteWords and how it helps children with Autism.
The purpose of using this app is that it helps students with Autism and with communication disorders be able to begin to identify letters and work on letter formation! It also helps the students learn animal names!
How Does iWritewords Work?:
iWriteWords is an app that helps children learn letter names and letter formation. In the video, a seven-year-old boy, named, Jake used iWriteWords. As he played a letter appeared on the screen. When the letter appeared on the screen, the computer said the name of the letter. Then on the letter, numbers appeared (showing the child which direction their finger should go to form the letter). As Jake moved his finger along the letter, whenever he moved his finger in the wrong direction, the game would make an "error" sound and have Jake start over. This process would continue until Jake's finger followed the correct path to form the letter. The procession of letters was no coincidence. After a group of letters were successfully formed, they made a name of an animal. The computer would read each letter Jake had formed, and then say the word he had made, for example, bunny. Then a bunny would appear on-screen.
iWriteWords and Students With a Communication Disorder:
From watching this video and learning about the iWriteWords app, I learned that even though students with a communication disorder may not be able to verbal identify his or her letters for me, they can show me in a different way that they know them! Through using iWriteWords, a student with a communication disorder is learning the names of the letters in a fun way! After using this app multiple times, I could easily enforce a student with a communication disorders letter identification skills by providing them with the alphabet and asking them to point to specific letters!
Parent Perspective:
I think that any parent would be thrilled with their child being able to successfully use iWriteWords! After playing iWriteWords, the child may be able to start small by forming the letters in his or her name and as he or she plays the game more, they may be able to form more challenging words!
Child Perspective:
I think that any child, whether they have Autism or a communication disorder, would love playing iWriteWords! Since iWriteWords involves so much finger movement and has fun sounds and noises, the child would be so busy having fun playing this game that they would not even realize that they are learning at the same time!
Teacher Perspective:
With the help of iWriteWords, a teacher may be able to have the student begin to create some words since they have had so much practice with letter formation. Additionally, since the students have also seen pictures of animals and heard the animals name along with the picture, the student may now be able to also identify some animals!
To learn more about Jake or the iWriteWords ipad app, watch this video!!!
In my last blog post, I talked about the AT assessment process. As a reminder, once an educator has chosen an AT device for a student in their classroom, the process does not end. The teacher can use either free or commercially available assessment tools to make sure that the AT device is properly benefitting the student and helping them become more independent in the classroom. In this blog post, I am going to be talking to you about a specific AT device, the iPad and how an O.T. named Lauren used iPad apps to help the Autistic and nonverbal children she worked with. As I discuss Lauren's success, I challenge you to use the AT assessment process and see if it would be appropriate for a student in your room!
During Lauren's presentation, she presented her listeners with numerous apps that would be very beneficial when working with Autistic or nonverbal children. The iPad is a great AT device for these students to use because 1) they are extremely socially acceptable and the student using the device will be "cool" instantly just for having one and 2) they give those nonverbal children a voice!
Most of the apps Lauren talked about were for preschool-aged students. Although Lauren gave examples of apps that could used to help finger movements and using your hands (for students with clenched fists or little hand coordination), teach social cues and even teach some academic content in a fun developmentally-appropriate way for these students, in this blog I am going to be focusing on the communication apps that Lauren talked about.
This summer I am a swim instructor at a local day camp. In the three-year-old bunk there is a little boy who I will refer as, as Roger. I have been working with Roger for a week now in the pool and he is nonverbal. Roger also avoids eye contact and does not seem to pay attention to me when I give him instructions. Roger's parents are currently in the process of getting Roger diagnosed, but at the time, all I know is that he is nonverbal. As Lauren was discussing the communication apps for the iPad, I couldn't help but think how amazing it would be if Roger could use one of these apps to help him communicate with me at the pool (without ruining the iPad of course)!
The Communication Apps
YES/NO: YES/NO is an app that gives the students two options to respond to a question. Two large boxes appear on the screen. One says, "yes", and the other says, "no." If the child is nonverbal, this app would be a great way for the child to respond to a yes or no question. An educator or parent can additionally customize this app if they want to give their child different choices. For example, if you want the child to choose between milk or juice, you can customize the boxes to say, "milk" and "juice" so that if you ask the child whether they want to drink milk or juice, they will be able to tell you what they want with the help of this app!
Sono Flex: This communication app has FREE downloads every friday! This app is great, especially for educators, because you can set themes. For example, if a teacher is giving an art lesson, you can use this app to customize the options on the screen to all involve an aspect of art. This app is also great for the child. Sono Flex offers an "about me" page. On the "about me" page, the child can customize the app to say their name, their age and any other question someone may ask them about themselves throughout the day. This aspect is FANTASTIC, because it is so important for a nonverbal child to be able to communicate with their peers and let them know a little about themselves!
Tap To Speak: Tap To Speak is a communication app that gives the students specific choices, like greetings. The downside to this app is that unlike Sonoflex, it is not very customizable.
Sow Touch: This app is great for the nonverbal student in the classroom. Sow Touch provides the student with a variety of pictures, for example, animals. If you want to see whether or not the nonverbal student knows what a cat is, you could ask them to point to the cat!
Sign Language App- This app is more for the educator or parent of a nonverbal student. If the student is learning sign language, this app allows you to choose a word you want to sign, and shows you a short visual image of how to sign that word so that you can communicate with the child!
When thinking about Roger, I think the YES/NO app and the Sonoflex app would benefit him the most at the pool. Since he is so young, in the pool we are working on very basic skills, such as blowing bubbles under water, kicking our feet and floating on our back. The YES/NO app would help Roger be able to tell me if he feels comfortable performing those tasks, since he is not able to tell me himself. Additionaly, if "swim" is one of the themes on Sonoflex, Alex could use this app to tell me what he likes to do, what he wants to do, and what he doesn't want to do! Additionally, if I had a student like Roger in my classroom that was nonverbal, I would most definitely take advantage of these apps and use them to help my student communicate with me and his/her peers!
Any of the communication apps, or the other apps for the iPad that Lauren discussed in her video would be EXTREMELY beneficial in the classroom. As educators, we want any nonverbal students in our class to be able to communicate at any means, so the communication apps are GOLD! Additionally using the social skills apps would help them see how they are supposed to behave in different social situations and the academics apps would be a fabulous developmentally appropriate way to teach the content to these children in a way that they will enjoy!
To learn about more apps that help Autistic and nonverbal children, please watch Lauren's video below!
In my last blog post, I talked about the process of deciding if a student needs assistive technology and how to choose what assistive technology device to use. In this blog post, I'm going to talk about how educators can assess the AT tools that they have decided to implement to help a child succeed in the classroom. The purpose of this blog is so that educators understand the importance of assessing any AT device they have chosen for a student and also understand the importance of finding out how the student feels about the device.
FREE Assessment Tools:
HAAT
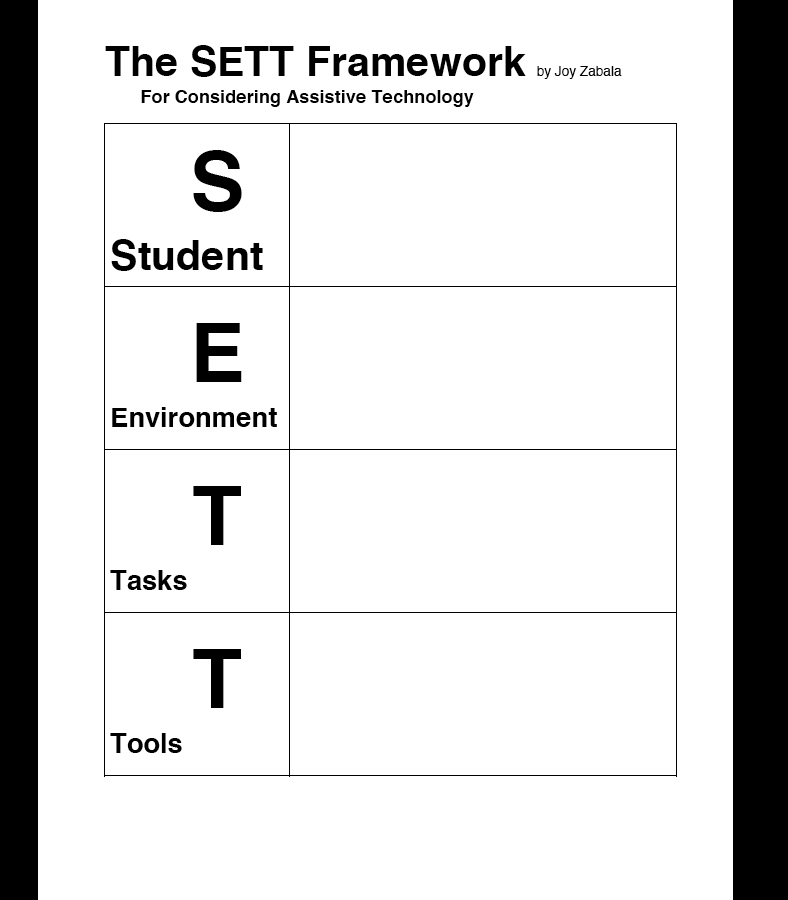
Student, Environment, Tasks and Tools Framework (SETT): As the name may imply, SETT asks the team to consider the Student, Environment, Tasks, and Tools when making AT decisions.
Human Activity Assistive Technology (HAAT): Originated from the Human Performance Model."The HAAT model demonstrates the interaction among assistive technology and three other components: human (the human's abilities and skills), activity (the activities the person engages in), and context (the environments - social, physical, and attitudinal - in which the activities occur)" (Assistive Technology Internet Modules).
WATI/ ASNAT: "This manual, including forms, was designed to guide the team through the process of AT assessment by addressing common difficulties and specific AT-related issues" (Assistive Technology Internet Modules).
Three main components are information gathering, decision-making and trial use.
Georgia Project for Assistive Technology (GPAT): "Created a comprehensive set of forms designed to guide the team through the assessment process from consideration to feature matching and implementation" ().
Protocol For Accommodations In Reading (PAR): "A formative assessment tool that may be used by educators to determine the most appropriate reading accommodation for a student" (Assistive Technology Internet Modules) .
PAR
Commercially Available AT assessment Tools
Functional Evaluation technology (FEAT):Uses ecological, practical and ongoing assessments to collect data about AT.
Stages: "A computer-based assessment tool designed for individuals with known developmental delays. As such, assessments are based on developmental sequences rather than chronological ages or grades. The seven areas include Cause and Effect, Language Readiness, Emerging Language, Early Concepts, Advanced Concepts and Communication, Functional Learning, and Written Expression. Automatic data collection capabilities are a part of the program. The data may be used to develop a student's IEP as well as chart progress toward IEP goals and state standards" (Assistive Technology Internet Modules).
If you are interested in purchasing the Stages assessment tool, but want to know more, here are some "how-to" videoson the assessment process.
AT Assessment: Developing a Written Productivity Profile: Used to assess a student's handwriting abilities and then to determine which AT is appropriate. "The four areas that are critical to writing success, and are discussed in the manual, include handwriting - with a specific focus on productivity and speed, keyboarding, spelling, and written expression. The manual presents four ways of obtaining data regarding handwriting: (a) writing the alphabet, (b) copying a sentence, (c) writing a dictated sentence, and (d) composing a sentence to determine the student's ability to convert oral language to written language. The same four tasks may be performed on a keyboard and the results may be compared" (Assistive Technology Internet Modules).
Assessments Used To Assess A Student's Satisfaction With AT:
Canadian Occupation Performance (COPM): This assessment detects a users self-perception of AT over time in the areas of self-care, productivity and leisure.
Matching Person and Technology (MPT)- In order to match a user with the most appropriate AT, this assessment takes into account "(a) the environments in which the person uses the technology, (b) the individual's characteristics and preferences, and (c) the technology's functions and features. This tool focuses on the user's goals and preferences" (Assistive Technology Internet Modules)
Psychosocial Impact Of Assistive Devices Scale (PIADS): PIADS is a "self-report questionnaire consisting of 26 questions related to the impact of AT device use on a person's functional independence, well-being, and overall quality of life." (Assistive Technology Internet Modules).
Quebec User Evaluation of Satisfaction with Assistive Technology (QUEST 2.0): QUEST 2.0 is used to evaluate a person's satisfaction with a wide range of AT.
Using the ATIM website, I learned that the assessment process does not stop once the assistive technology device has been chosen. This blog post relates directly to the classroom because educators need to makes sure that they are assessing the AT devices that they have chosen for their students. Educators have access to several free and commercially available assessment tools to use to make sure that the AT device is benefiting the user. Additionally, educators can also have the student using the AT take one of the above satisfaction assessments to find out just how happy they are with the AT chosen. It is important to not only make sure that the AT is helping the individual become more independent in the classroom and more successfully, but also that the student likes using the AT!
In my last blog post, I talked about word prediction software and talking word processor software, which are two different assistive technology softwares that could benefit students in schools. After describing the two different AT softwares, I gave resources to help educators try to decide which software would be most appropriate for the student to choose. In this blog, I am going to talk about the process educators go through when trying to decide if AT is necessary to help a student in their room and the process to decide which AT would be the most appropriate to use. If the IEP team determines that the student needs AT to access and participate in the school environment, and more information is needed then the AT Assessment process is initiated. The purpose of having an assistive technology assessment is to "identify technology options that will accommodate the needs of students with disabilities. Such options should increase, improve, or maintain student functioning in educational, vocational, and community environments" (Assistive Technology Internet Modules).
When beginning the AT assessment process, the IEP needs to consider:
1) the student, the student's environment and the tasks the student can accomplish independently if provided with AT.
2) Next, identify the student's strengths.
3) The SETT (Student, Environment, Tasks, and Tools) framework is very helpful in this process. "The SETT framework helps teams gather information about a student's strengths, skills, and challenges" (). All of the above aspects need to be considered before the IEP can consider AT.
What Is The Next Step?:
The IEP team should now begin to look for AT options that would be most effective by first looking at the student's needs.
Once desired features have been identified, the team needs to discuss solutions that are available at home or at school and see if their features match the student's needs.
Guidance To Help Choose AT:
Assessing Student's Needs for Assistive Technology (ASNAT) organizes information by AT categories (example: AT for communication) to help guide the team to identify features that will address student needs.
TechMatrix is a website that "allows users to identify potential AT solutions by creating a customized search based on the selected features. This website is specifically developed for finding technology options for students with special needs" (Assistive Technology Internet Modules)Assistive Technology Internet Modules. Once users have clicked on the SEARCH tab, they are able to refine the number of resources based on content area, grade level, role, learning support, accessibility features, NES Standards and Tech Specs
What Happens After AT Is Chosen?:
The team should have the student try the technology first.
During this trial, data should be collected to determine its effectiveness.
Next, the team looks over the data and comes to a decision about using the AT and how it is going to be purchased.
Once purchased, the AT needs to be implemented. The IEP team must make up a plan that involves training, environmental considerations, ongoing evaluation and the roles and responsibilities of the team members during implementation of the AT.
Progress monitoring should be done on the AT. "Progress monitoring is a scientifically based practice that is used to assess students' academic performance and evaluate the effectiveness of instruction" (Assistive Technology Internet Modules).
Also consider transition planning for the student.
How Does This Relate To The Classroom?:
As educators, it is our responsibility that all of our students can succeed in the classroom. You are going to be responsible for helping an IEP team decide whether or not an AT device would help a student succeed in the classroom and if so, which device would be the most appropriate!
I never realized how simple the AT process really can be! When an IEP team works together to think about the student's specific needs and how AT can help them become more independent in the classroom, the process can be quite easy! The process becomes especially easy when educators have ASNAT and TechMatrix to help them find the most appropriate AT!!!
In my last blog post, I described how I changed a lesson I had previously taught, to make it more UDL friendly and to make sure that there weren't any barriers to learning for any of my students. In this blog, I am going to talk about different ways that educators could make their lessons more UDL friendly and to also help make sure there are no barriers to learning. A great way to do this is to implement assistive technology to help those students that need it! The hard part is figuring out what assistive technology device is going to help the students needs.
Option #1: Word Prediction Software Word prediction software is most helpful to students who struggle with writing. The type of learner that would need to use word prediction software are learners who have illegible handwriting, struggle with spelling and grammar and have trouble translating thoughts into writing. When using the word prediction software, the software "predicts" the word that the user intended to type.
Some brands of word prediction software that is used in schools are Aurora Suite, Co: Writer SOLO, EZ Keys for Windows, Words+, Inc, SpeakQ, Text Help, Read and Write Gold, Word Q and Quillsoft. I watched a tutorial for the Co: Writer SOLO word prediction software! From watching the tutorial I learned that this word prediction software is REALLY cool! This software comes with a word dictionary. When the user misspells a word, the dictionary pops up with a list of "predictions" of the word the user may have meant to spell. The user can then move the mouse over the words in the dictionary and the software reads the words to the user. If the word the user meant to spell is on the list, the user clicks the word and the software fixes the spelling error. Additionally, if the word the user spelled is not on the initial dictionary list, the software allows the user to see more lists of words until they find the word that they were looking for! The user can even customize the dictionary based on the topic they are writing about! If you are an elementary educator, trying to decide if word prediction software is appropriate for a student in your room, this website is a great resource to use!!!! Option #2: Talking Word Processor Software The talking word processor software would be most helpful for students who are poor writers, readers and students who have visual impairments. Since talking word processor software allows the users to hear every letter, word and sentence that is typed, it helps struggling readers listen to the words and choose the right word based on how it sounds. This software is also beneficial for students with visual impairments because it allows the users to enlarge the size of text and change the color and background of the text. The types of learners who would need to use a talking word processor are those who are reluctant to write, have moderate grammar and spelling challenges, struggle with reading and write better with auditory support. Three frequently used talking word processing programs include IntelliTalk II, Write: OutLoud, eReader and Type & Talk.
I watched a tutorial for the Write: OutLoud talking word processor software. This software allows the user to hear what they have typed while they are typing and also hear it read back to them to make sure their sentence makes sense. This software also offers a talking spell-checker. For each word in a users writing piece that is spelled wrong, the user can HEAR other correctly-spelled options to replace that word! This software also has a homonym checker. If a student thinks they used the incorrect form a word, the student would use the homonym checker and read the definitions of all the homonyms of the word the user typed. Depending on the definition, the user would select the correct homonym! The greatest part of this software as far as educators are concerned, is that it allows teachers to modify the software for when the students are taking a test! The program allows the teacher to be able to enable or disable the spell checker, dictionary and homonym checker features of this software during a test!! If you are an educator trying to decide which talking word processor software is appropriate for a student in your classroom,this website is a great resource to use!!
In my last blog post I talked about how I used the Curriculum Barriers Tutorial website to help me see which UDL areas I had covered and if I had any barriers to learning for any students in my classroom in a lesson I had written. With the help of this website, I learned that in my last blog I had not included, the UDL areas of expressive skills and fluency, interest and self-regulation. I had also noticed that I had created some barriers for a student of mine, "John", who is currently receiving O.T. because he has difficulty with writing and perceiving where his writing and drawings go on a page.
How Did I Change My Lesson?
1) Expressive Skills and Fluency - The students are allowed to use media, such as "Kids Work" to help them draw what they think a tree looks like. This change also benefited John.
2) Interest- I decided that I wanted my students to understand why it was important for them to learn about trees. I let the children know that it is the trees that provide us with oxygen that help us breathe! This real world connection would really help the students become more engaged.
3) Self Regulation- To make sure that the students were comprehending what I was teaching them, I decided to add a self-assessment so that the students could let me know if they needed more clarification or not.
The UDL template was also really helpful for me to think more about my struggling students, like John . Using the UDL template, I was able to alter my lesson so that there would be no barriers for John! This is such an important tool to use because as educators, we want to make sure that the content we are teaching is being taught in a way that all students will be able to access it !!!!
In my last blog post, I talked about the Curriculum Barriers Tutorial website. As a reminder, this website encourages teachers to think about the students in their classroom and look at their lessons to make sure that the methods and materials they chose to use do not create a barrier for any students in their room.
In this blog post, I am going to be reflecting on a lesson that I created for my kindergardeners. I am going to pay close attention to the UDL guidelines that I included in my lesson and the guidelines that I left out. I am also going to make use of the UDL Template to make sure I do not have any barriers for the students in my room, if I taught this lesson again.
A Brief Outline Of My Lesson
I began by incorporating a KWL chart. I asked the students to name some things that they already knew about trees, and what things they wanted to learn about trees.
Next, I handed the students a blank journal. I told the students that this was going to be their tree journal and everything they learned about trees was going to go inside of it. On the cover, I asked the students to write their name and draw a picture of what they thought a tree looked like.
After this, I took the class outside to their playground. Once on the playground, we took the time to stop and look at a few trees. While at each tree, we took some time to observe. I asked the students some prompting observation questions, and gave each child the opportunity to respond to the prompt.
After some time for observations, and noticing some similarities and differences between the trees on our playground, I moved onto the parts of the tree. While standing next a tree, I began to point out the parts of the tree. As I pointed to the parts of the tree, I explained what they were (roots, trunk, branches and leaves), their functions and how the parts of the tree are related.
Next, we went back inside. Once inside, we looked back at our KWL chart. I asked the students to raise their hand and share one thing they learned about trees that they did not know before.
The UDL guidelines I included:
Perception
Language
Comprehension
Physical Actions
Executive Functions
Effort and Persistence
The areas of UDL that I did not include:
Expressive skills and fluency
Interest
Self-regulation
I used the UDL Template (see below) to asses a student in my class who I am going to refer to as John.
Curriculum BarriersBlank
Template
Materials and Methods
Student Qualities
Potential Barriers/Missed Opportunities
Writing name on journal.
John- Perception difficulties.
John' s writing has a tendency to be all over the place. Although I have provided him with a pencil grip, John may also benefit from the use of Wiki Stix's to help him see where to write his name.
Drawing a tree
John- Fine motor problems and perception difficulties.
John is currently receiving O.T. to help with his fine motor problems. Drawing may be too challenging and not engage him enough. Additionally, with his perception difficulties, John may not be able to visually see where to put his tree on the cover. (He may draw it small in the corner, if at all).
Wiki Stix
I was actually very pleasantly surprised about how many of the UDL guidelines I included without even realizing it. I was able to additionally use the UDL guidelines to implement the areas I had not previously included into my lesson. I used the UDL Template (seen above) to help me use the lesson I created and adjust it to make sure a struggling student in my room did not have any barrier to learning!
In my last blog post, I talked about guided notes. Since many teachers choose to introduce new information through lectures, guided notes was a helpful tool to help lectures be meaningful to both the teacher and the students.
In this blog post I am going to be talking about the Curriculum Barriers Tutorial website. The purpose of the Curriculum Barriers Tutorial is to take a teacher step-by-step through a daily lesson.
Why Is This Website So Great?
The website makes you think about the struggling students in your classroom and list all of the materials and methods a you would use during a specific lesson. With those materials and methods in mind, this website has you think about the qualities of those students (ex: low vision) and how the materials or methods a teacher decided to use may be a barrier for those students.
How You Can Use This Website To Help In The Classroom Or At Home
With the help of the Curriculum Barriers Tutorial, if you as an educator, or a reader, were interested in using guided notes in your classroom, or with your child at home, you could decide whether this teacher method would be a good choice for your classroom, or if it would be a barrier for students in your classroom. For example, if you have a student who struggles with writing, using the guided note method may be a barrier for them.
This website really got me thinking about all the different materials and methods I used to teach my kindergartners. As I planned each lesson, I thought about differentiation, and how I could meet the needs of all learners in my classroom, and I always hoped that, at the end of the day, each of my students left the room understanding what I taught. With the help of the Curriculum Barriers Tutorial, I would be able to thoroughly analyze the materials and methods I am using to make sure that there are no barriers or missed opportunities for any student in my classroom! The Curriculum Barriers Tutorial website even provides teachers with a Curriculum Barriers Template (seen below) to offer the them "structured support for analyzing potential barriers and missed opportunities in your own curriculum, within the context of your goals and your particular students" (CAST).